In this post I’ll run step by step through how to start a travel blog and make money. First, watch the video and follow the Quick 3-Step Setup Guide below and you can have your basic travel blog up and running in just a few hours.
But, if you want that travel blog to make money, that takes more work. Sorry to burst the bubble – trying to start a travel blog to make money takes a lot more time and effort.
So, after the quick setup guide that will show you how to create a travel blog online, I’ll run through the 8 advanced steps that you need to think about to make an impact, and earn an income from your travel blog.
How to start a travel blog and make money
Creating a travel blog has never been easier. Watch me outline the first few stages of how to start a travel blog – in only a few minutes! Then continue reading below for in depth steps on turning your blog into a profitable business.
Resources from video:
(Some of these links generate a commission for us upon purchase – read more below about why that is a win/win for us and you, the reader.)
Quick 3-Step Setup Guide – How to start a travel blog
The below 3 steps can be implemented in just a few hours. These 3 steps are a more detailed version of what was covered in the video.
Step 1: Get quality hosting, a domain & install WordPress
This may sound like a lot of items to complete, but actually you can do all this in just a few minutes.
When we started we used some pretty inferior hosting. This lead to the site being down, often, and a bunch of other problems.
In Jan 2014 we changed to Bluehost and have been super happy with the results. We now get well over 60,000 uniques visitors to our sites each month and we are still on the basic plan.
There are a few reasons why Bluehost can handle this traffic. For example, the CDN (Content Delivery Network) called Cloudflare, that is included in the price. Cloudflare delivers your photos to your website from a different server – reducing how hard Bluehost has to work. Which reduces your load times etc. keeping Google and your readers happy.
Anyway, this is not a technical breakdown. Suffice to say, for a $5-ish per month, Bluehost Rocks! And it’s super easy to set up.
Get Your Hosting Setup
Discover the latest discount on Bluehost with this link which will take you to the Get Started page.
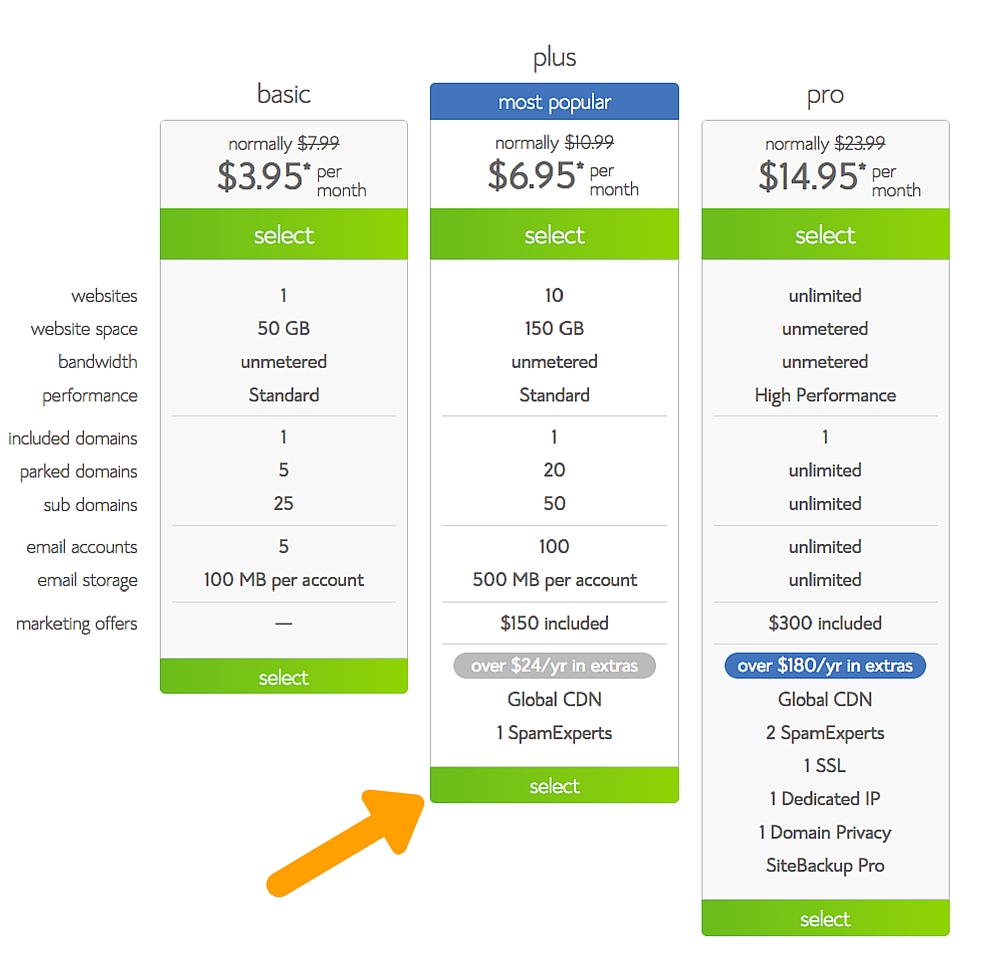
Options start from $3.49 USD per month (at time of writing – with discount link above applied) – though I suggest taking the “PLUS” option, as it includes the CDN as well as allowing you to host multiple websites, and some bonus ad credit you can use to promote your new blog for free – to start getting traffic from the get go, and begin your journey towards being able to make money travel blogging (Credit is normally only available to USA customers – check the Ts&Cs).
Using our link will take you to the latest discount offers. With 2+ years experience with Bluehost we are very happy to recommend them as the perfect entry level (and beyond!) affordable hosting option. We do make a commission from sales made through our discount link, which helps support our blog. The price you pay is the same with or without our commission payment – Bluehost keep our comission for themselves if you don’t use our link. Many major hosting companies pay bloggers commissions for recommending their products. We choose only to recommend Bluehost, as they have been awesome for us.
A few key points for Bluehost that we like:
- You get a free domain when you sign up (Value ~$15) – saves you buying one separately.
- Live 24/7 chat support – get live answers to problems no matter where you are or what time of day it is.
- One click wordpress install – Get your travel blog up and running in seconds. Zero coding knowledge needed.
- They have a pro-rata refund policy (If you leave at any time, you can get a partial refund for the remainder of the contract – check Ts&Cs before purchase).
- Very modern hosting with easy to use control panel – everything is a click away.
- You get the CDN (As mentioned above) – helping your site load faster.
Get Your Domain
After choosing your package level, you can pay securely using the method of your choice and choose your free domain name.
Search all available domains and select one that is perfect for your new blog!
If you already own a domain name, you can propagate your current domain to Bluehost from wherever you purchased it – more info here.
Install WordPress
Once your hosting and domain are activated, you can log into the control panel for your Bluehost account.
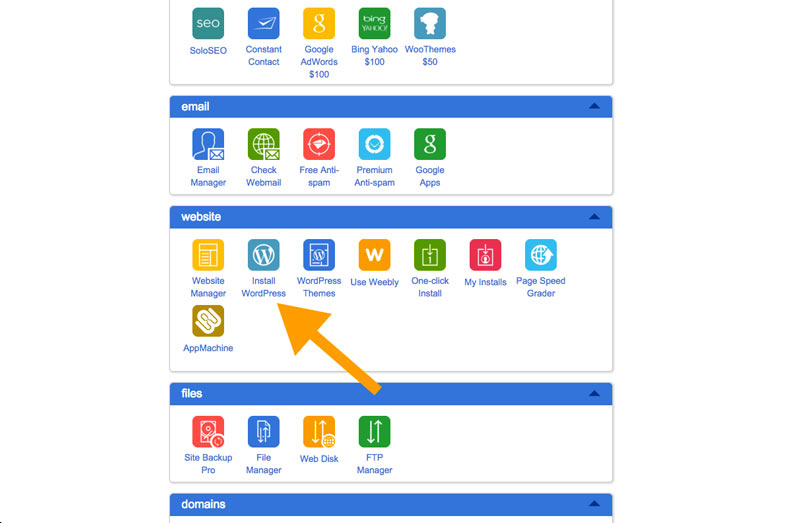
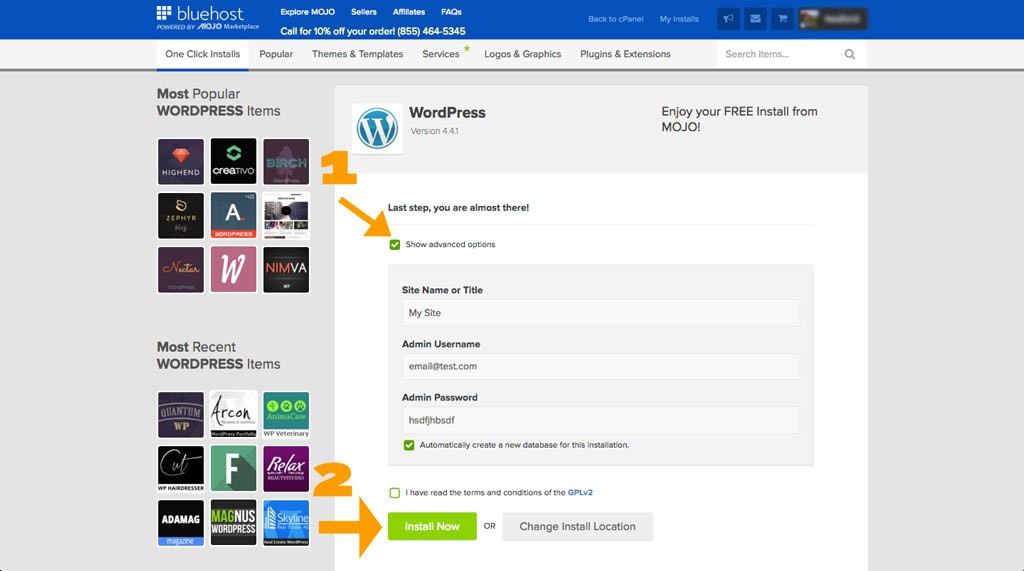
From here you can instantly install wordpress on your domain. Scroll down to find the “Install WordPress” button.
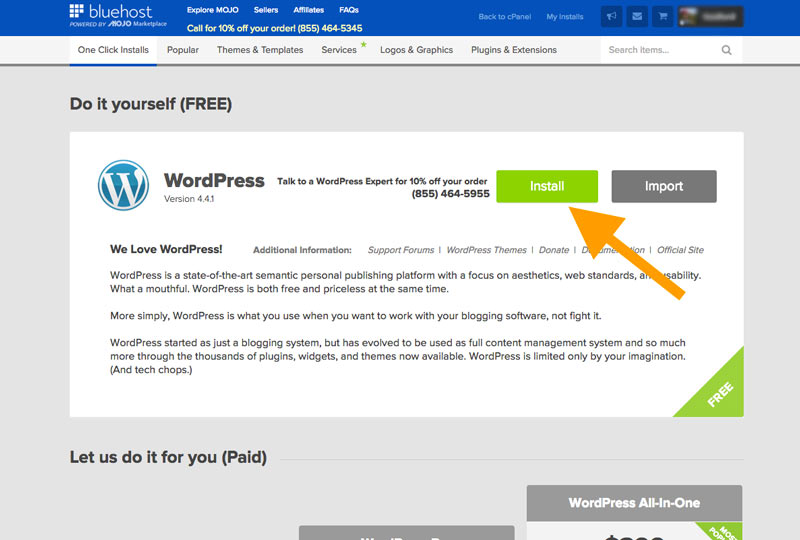
On the next screen hit the “install” option on the do it yourself section. Although Bluehost do offer assisted install options, most users with basic internet knowledge will be able to install everything themselves.
This next part is important. On the next screen, click the “Show advanced options” button. This will let you set your username and password (as well as the name of your travel blog).
If you don’t do this here, you’ll have to use the auto generated ones. Which is a bit annoying. So change it before you install, and make a mental note of the information.
Then tick the terms and conditions box and click install now.
The install will happen in the background and will take about 10 seconds. You should see a progress bar in the header on your screen.
Once complete, head to “http://www.YOURDOMAIN.com/wp-login.php” in order to login to your wordpress dashboard using the username and password you just created.
Yay! Your Bluehost install now exists on the internet! Time to make it into a travel blog…
Step 2: Make your site look professional – Themes
With so many amatuer personal journal blogs out there, you need to establish yourself as being a pro from the second someone lands on your travel blog.
Readers make a decision within the first 5 seconds as to whether they “trust” your site. If you look like an amateur, your content will be regarded as sub-standard before they even start reading.
The solution is a professional theme with engaging landing pages.
For an all in one package, we use Optimizepress – click the link to watch a short video about exactly how it works.
Optimizepress lets us custom create (or choose from easy templates) clean and professional landing pages that convert… And by convert, I mean sell products, get opt-ins to our email list and increase the chance of readers taking any other action we need them to.
If you want customers, landing pages are proven the most effective way to convert visitors to paying customers.
You’ve almost certainly been on a landing page before, and most of you will have at some point purchased something on a landing page. Here is an example of a landing page, for our upcoming travel blog summit, where we are looking to gather new leads by getting email addresses.
Optimizepress also works as a theme for your standard blog posts. It’s a super-clean blog theme with a lot of flexibility. But, if you want to inject more personality into your blog, you might want something with a more unique design.
Most of our blogs, including this one, use a combination of Optimizepress (as a plugin) and then a separate theme. This lets us build landing pages, as well as have blog posts with a little more personality than what the plain optimize-theme offers.
If you are looking for value for money, then getting an “out of the box” theme, rather than paying a designer, is going to save you a bundle.
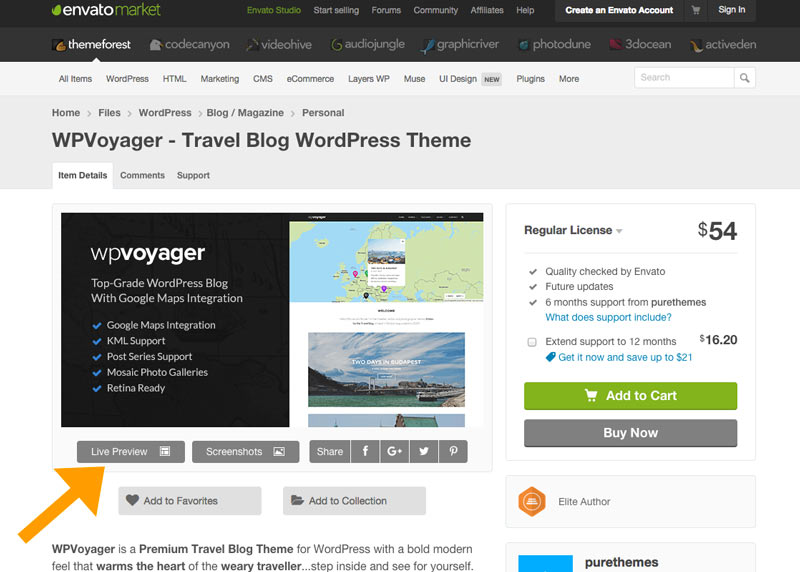
We get all our pre-made themes from Theme Forest you can do live preview demos of each design and get a real feel for how they look for the end user. They have a big selection and most are “mobile responsive” – which is essential for all modern websites so they look good on mobile devices as well as personal computers.
We make a small commission from both Optimizepress and Theme Forest if you purchase after using our links. We actively use both companies for our blogs and have done since early 2014 – that’s why we recommend them.
Another theme option which comes highly recommended from other bloggers is Elegant Themes. The reason to consider them is that they offer an entire theme package – rather than just an individual theme – at a very competitive price.
They also offer “Divy” Theme, which lets you custom design your blog theme – with a graphical user interface, rather than coding.
Once you have your theme, you need to install it which you can do using the left hand menu of the wordpress dashboard: Appearance -> Themes
More on themes and landing pages in our complete article / podcast.
Step 3: Make the engine tick: WordPress Plugins
WordPress runs out of the box. But to make the most of it, you need to install additional plugins. This is real easy to do.
On the left hand side of the wordpress dashboard, you’ll see “plugins” as a menu item. Click through and “add new”. Then you’ll be able to search for all the plugins you need – many of them are free.
The two most important you should install straight away are:
WordPress SEO by Yoast – This will help you with SEO (search engine optimisation) so you get more traffic to your website. Click through to learn more about SEO and why it’s important.
Wordfence Security – This will protect you against hackers as well as optimise your site loading speed.
For a complete rundown on all the essential plugins we use to make our site better, check out our full list. (Coming Feb 8th 2016)
How to start a travel blog and make money
In the last 3 steps you learned the physical process of creating a travel blog and getting it onto the web. In this section, I’m going to describe the key steps to consider for actually making a profit from your travel blog.
Step 1: Creating a travel blog business – not a travel diary.
If your travel blog is your internet diary, it’s not a business.
If you just write whatever pops into your head about your travels and hope that through the over saturated internet, full of millions of blogs, your voice is the one that get’s sent money… Well, you’ll be joining the 80% of all bloggers who have never earned a single dime from blogging, ever.
So, what’s the solution.
Build a business.
To do this, you need to have a clear notion of how your blog will make money.
Who is your target customer?
What do they want. And more importantly what do they want to buy?
What content should you create that will be useful to them, as well as encourage them eventually buy something?
You must decide what product or service you will provide in order to make money.
- Will you create your own physical or digital product?
- Will you offer travel tours?
- Will you recommend affiliate products they need?
- Or become a freelance writer?
- Will you rely entirely on advertising?
- Or a combination of all these things?
You should tailor the content you create around your business plan so it attracts customers, rather than just readers.
Your content should be clickable, shareable, as well having solid SEO to get you lots of targeted organic traffic from Google.
So, step one to travel blog profit is to have a business income plan. Write down a list of the monetization methods you want to include in your travel blog.
– Not sure about monetization methods? Learn 18 unique ways pro travel bloggers make money from blogging.
Connect those methods with solid branding and a blog direction (mission) that will attract readers and customers. Only then will you be heading in the right direction, rather than just spending years writing content no-one wants to read.
Speaking of content…
Step 2 – Create cornerstone content for your travel blog
Getting traffic early on is tough. When you start out you will have very little authority so you need to create authority, as well as traffic, to get your foot in the door.
Easier said than done, but one key way you can start making it happen: Cornerstone Content.
Instead of writing hundreds of random articles about all your travels, choose to write 3 or 4 super informative posts that are really helpful and are well SEO’d (Search Engine Optimised).
By doing this, you will have a few sharable, searchable articles that you can use to start promoting your blog, as well as eventually get organic traffic.
SEO is a bit of a learning curve, but it is a skill anyone can learn. The basics are actually pretty straightforward.
One of the best tools I use for SEO research is called longtail pro – it saves me hours in research time to figure out the best keywords to target. I talk a lot more about how I use it in our “8 Steps to finding ranking keywords” mini guide – grab a free copy by entering your email below.
[magicactionbox id=”9230″]
Also, get your SEO foundations for free right now with our SEO training video where we explain how we took a brand new site with zero domain authority from 0 to 65,000 page views per month in less than 12 months with only 6 SEO articles – we didn’t even post any new content in 12 months after launch.
Step 3: Link up your social media
Being on social media is important for traffic and for interacting with your audience.
That said, it is also very time consuming. It’s worthwhile starting accounts with all the major social media sites, just so you reserve your brand name.
But, you may want to consider limiting yourself to 2 or 3 sites that you focus on building an audience with – leave the others just as holding pages that direct your audience to your main social media accounts elsewhere.
Which are best for travel bloggers?
Facebook – is good for any industry. But, engagement has become more and more about paying Facebook to show your followers your posts. So, it’s a tough place for newbies to make waves.
Twitter – is GREAT for reaching out to companies. We’ve secured complimentary travel stuff, resolved disputes and made amazing contacts through twitter. We get great engagement, click through’s and responses from both companies and followers through twitter.
Pinterest – With all your travel photos (and now videos), having a visual platform like Pinterest can be great for traffic. Every pin will have a link and is searchable by keyword terms. So, unlike most other social media, where the lifetime of a post is less than 24 hours, you can get Pinterest traffic from old pins for years.
Instagram – Also perfect for sharing photos and videos. The downside is that you can’t link to articles from your photos. The upside is, companies love travel bloggers with big Instagram following.
SnapChat – The new kid on the block. This is where the young audience is. It’s easy to snap short videos of what you are doing and post instantly wherever you are – making it non-time consuming.
Youtube – If you plan on recording longer travel videos, this is perfect for travel bloggers or vloggers. You can easily embed youtube videos in your blog posts using WordPress.
Google plus… is dead. The only benefit, which may not last much longer, is people who follow you on G+ will get your posts more likely to appear in their search results on google. It’s a lot of work for little return though.
Periscope – Interact live with your audience through streaming video. Also, low maintenance to just periscope what you are up to – LIVE.
Step 4 – Get the right travel blogger education from day one.
We wasted our first 2 years as bloggers making tons of mistakes. From choosing a low income generating niche, to branding ourselves so wrong that people just got confused, rather than inspired by our blog.
If you want to avoid wasting a lot of time, it pays to get in-depth education from someone who can help you skip the mistakes and just build a pro travel blog right from the start.
In 2016 we created the first ever Travel Blog Monetization Summit – where we interviewed over 15+ travel bloggers and influencers about the best techniques to build a profitable travel blog. And it was a huge hit! So much so that we released it as a dedicated course and will be having another summit in April 2017.
The Travel Blog Summit Offers:
- Over 20+ hours of dedicated monetization techniques and action plans to help you start making money sooner.
- 100% focus on money No fluff. Only proven, professional monetization techniques.
- Strategies from 15+ travel bloggers and influencers who fully reveal specific strategies to run successful travel brands, with details on how they personally monetize their blogs.
- A dedicated and active private Facebook Group where you can continue to ask questions as you need them. All of the speakers are members and will be able to answer your questions directly. If not a knowledgeable member of the community will surely be there to help.
- Actionable content with:
⇒ Cheat sheets
⇒ In-Depth Video Interviews
⇒ Live Webinars & Screencasts
⇒ Downloadable Blueprints
⇒ And more
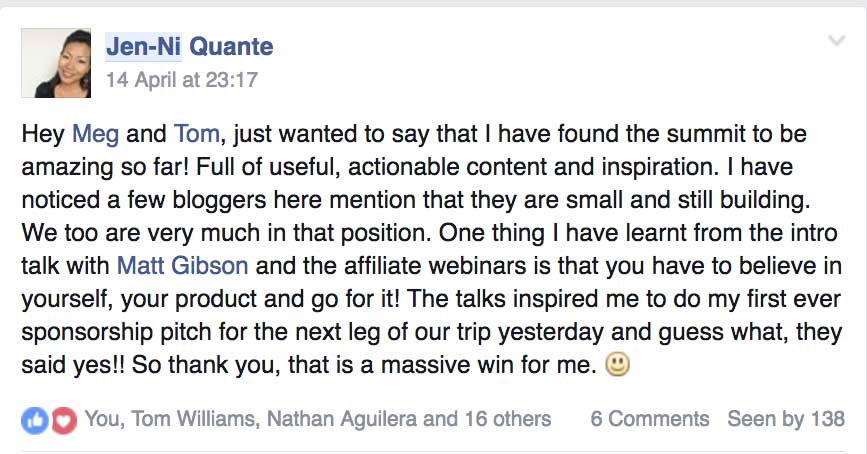
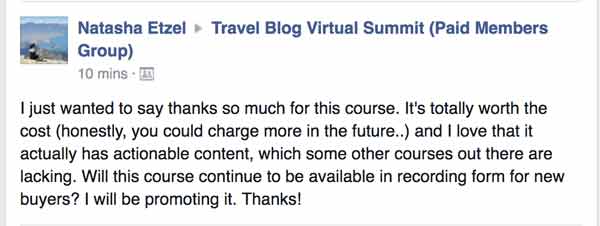
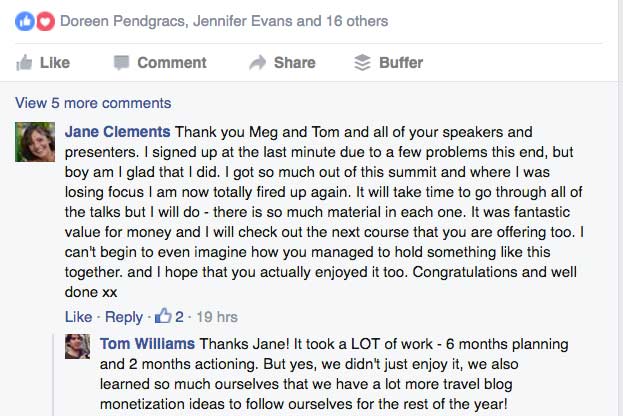
A few words from happy customers:
To learn more or to register for the Summit 17 or Travel Blog Monetization Course CLICK HERE
 |
 |
Step 5: Connect with your audience effectively.
Everyone who starts out, thinks blogging is about producing content and sharing on social media.
Actually, being as most social media (like Facebook and twitter) has about a 2% engagement rate these days, it’s not the best way to get your regular audience to see your stuff at all! If you get lucky and a post goes viral, or, you simply have a massive audience on social media, then you may see some traffic.
But, smart online businesses use email marketing. Because, with email, you are more likely to get 20-50% engagement with each broadcast email you send.
We personally use Aweber and the emails we send account for about 50% of our monthly revenue generation. Compared to social media, which may account for 5%.
“The money’s in the list” is a saying amongst email marketers for a reason! It really is.
Learn more about email marketing or take a look at Aweber and get your first 30 days for free following the link.
We’ve been using Aweber since April 2013, we do make a small commission if you purchase. We continue to use Aweber because it works great! And it’s very affordable for small businesses like ours.
Step 6 – Stop Creating, Start Promoting
Remember what I said about creating cornerstone content? Once that is done, stop creating content! Or, at least, create less content than you think you should. Max 1 new post per month.
This is the key step that most bloggers miss…
Blogging for profit is about more than just writing blogs. It’s content marketing.
Not only is your content a marketing tool. You also need to market your content. So start promoting.
Promotion is more than just sharing it on your Facebook page.
If you have content where you recommend a company, any company, email them or tweet them – tell them the content is out and ask them to share. If you write an article about Thailand, email Thai tourism and ask them to share it to their massive social media account.
Companies are always looking for positive press and are often happy to share even if your blog is brand new – as long as the content is good.
The golden rule:Promoting your best content repeatedly to NEW readers will grow your brand MUCH faster than promoting new content to your old readers – who already follow you. SEO & Outreach promotion are the best ways to achieve this.
|
Step 7 – Get Pro blogger experience
If you want to eventually get paid by companies and tourism boards to write about travel, you need to start getting experience.
As a newbie, think of yourself as an intern. You are not going to get paid on day one. Or even month one. You need to build your experience and reputation.
Start pitching companies to get on tours complimentary (or for discount) in return for writing articles or creating other content for them.
You may think you can’t do this if your blog is new… but that is not the case.
Get our free pitching template. It will help you get tours and other things in return for creating content. Enter your email below.
[magicactionbox id=”9056″]
Learn more about how to find your unique value and pitch travel brands for whatever you want.
Step 8 – Kick ass! And Get More Tips on How to start a travel blog and make money
Thanks for reading through this article. I hope your brain is now filled with ideas and you’ve been saved a lot of hours of wasted time by understanding the important steps that newbies often miss!
If you’d like to get more free advice and tips on building a profitable blog, join our core concepts blogger newsletter
[magicactionbox]
Happy Blogging!
Love this post? Why not pin it to your favourite business Pinterest board.
—
Have you found this article useful? Leave a comment below.








Thanks for the great tips! In the process of revamping my site and am stumped on some things but articles like this help me see things I never thought of 🙂
Glad we could help Andrea! Hope the revamp goes well 🙂
Hi guys,
I really enjoyed this post. Easy to read, informative and truly useful.
Most important you’ve given me some peace of mind. I’ve abandoned Google Plus since a few months ago but a guilty conscience kept bothering. Good to know (and relieving!) I’m not the only one who believe that it is dead or close to.
See you somewhere around the world.
Thank Claudio! Glad you found it useful 🙂
some stuff in here is misleading and wrong from the tech point of view, like the seo being solved w a wp plugin
Hi Miryam. You can’t really “solve” SEO – plugin or not, only optimize pages for SEO. Sorry if you found it misleading that that the plugin would do your SEO automatically – you have to use the plugin to do the SEO. The plugin saves you a ton of time in this respect. What else did you find incorrect form the tech point of view? I’d be happy to make updates to the article if you can explain what problems you have found?